If you’ve never done it before, wiring LED lights can be tricky. But no worries? Our easy, step-by-step instructions ensure proper wiring and performance in various weather conditions.
Motorcycle riders and car owners benefit from auxiliary brake lights, often LEDs. These lights will help other drivers see you when you stop.
Here we will also discuss auxiliary LED lights for Harley Davidson motorcycles, their wiring, and optimal functionality. With the right knowledge and tools, it’s not hard to wire extra lights, and you can do that in 40 minutes.

Benefits of Using Auxiliary LED Lights
- Improved visibility on roads, especially in low light or bad weather.
- Improved safety by enhancing vehicle visibility.
- LED lights provide clearer braking intentions for drivers.
- Customize your car’s appearance.
- LED lights conserve battery power.
- It lasts longer and costs less to replace.
- Weatherproof: Built to perform in all weather conditions
Why might You Want to Wire Auxiliary Lights?
There are many reasons to wire an auxiliary light to your car. First, Harley Davidson motorcycles with auxiliary lights look better. For a unique Harley look, many riders choose fog or driving lights. Second, an auxiliary light increases your visibility to other drivers. It’s crucial that other drivers can see you on a motorcycle or car. Finally, extra lights help you see the road ahead, especially at night or in bad weather.
What tools are Needed for Wiring Auxiliary Lights?
Gather the necessary materials and tools before wiring auxiliary lights.
- Auxiliary LED lights: Select compatible auxiliary LED lights for your vehicle.
- Wiring harness: This will be responsible for connecting the lights to your vehicle’s electrical system.
- Wire connectors: These are used to securely join the wires together.
- Electrical tape: To insulate and protect the connections from moisture and other elements.
- Multimeter: This tool will help you test the electrical connections and ensure everything is working correctly.
- Wire strippers are used to remove the insulation from the wires for proper connection.
- Zip ties: To secure the wiring and prevent any loose connections.
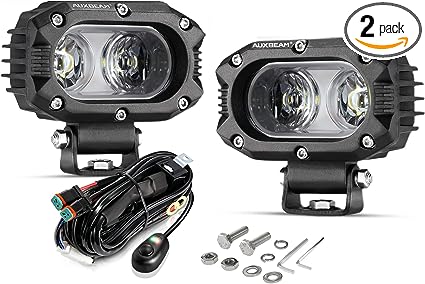
image source by Amazon
How to Wire Auxiliary LED Lights in 4 Easy Steps
You can wire an auxiliary light using the tools and materials above in four simple steps.
Step 1: Prepare Your Vehicle
- Ensure your vehicle is turned off and the battery is disconnected to prevent any electrical mishaps.
- Locate a suitable mounting location for your auxiliary LED lights. This could be on the front grille, bumper, or elsewhere.
- Clean the mounting surface and remove debris.
Step 2: Install the Wiring harness.
- Connect the wiring harness to the auxiliary LED lights using the wire connectors.
- Keep the wiring harness away from moving parts and hot surfaces as you route it.
- Plug in the wiring harness. Use the multimeter to check connections and functionality.
Step 3: Connect the Power Source
- Locate a suitable power source for your auxiliary lights. This could be the car’s battery or a circuit.
- Remove a small amount of insulation from the wiring harness power wire with wire strippers.
- Connect the power source to the power wire. Test the connection and voltage with the multimeter again.
Step 4: Test and Secure the wiring.
- Turn on the auxiliary light and reconnect the vehicle’s battery.
- Test the functionality of the lights by activating the brake or switch.
- After testing the lights, secure the wiring with zip ties and electrical tape.
Common Problems with Auxiliary Brake Lights
Auxiliary lights can cause issues; common problems and solutions
- Dim or flickering lights: Check the power source to make sure it can power the lights. Fix broken wiring and connectors.
- Lights not turning on: Verify that the wiring connections are secure and the power source is functioning correctly. Check for blown fuses or damaged wiring.
- Lights staying on constantly: Inspect the wiring and connections for any shorts or crossed wires. Ensure the brake switch is functioning properly.

image source by Amazon
Other Considerations for Auxiliary Lights on Harley Davidson and Cars
When installing auxiliary LED lights on your Harley Davidson or car, there are a few additional considerations to keep in mind:
- Local regulations: Familiarize yourself with the laws and regulations regarding auxiliary lights in your area. Ensure your lights comply with the necessary requirements and restrictions.
- Proper aiming: Adjust the aim of your lights to avoid blinding other drivers while maximizing visibility.
- Maintenance: Regularly clean your auxiliary brake lights to remove dirt and debris that may obstruct their performance. Check for any loose connections or signs of damage.
FAQ
Can I Wire Auxiliary Lights Myself?
Yes, you can wire auxiliary LED lights yourself, but it’s important to have a good understanding of electrical systems and safety practices before attempting the task. Wiring auxiliary lights involves working with electrical connections and components, so it’s crucial to follow proper procedures to ensure safety and proper functionality.
You can install auxiliary lights yourself if you understand the technical work, wiring diagrams, and tools. If the wiring isn’t right, you should get help from a professional.
How many auxiliary LED lights can I install on my motorcycle?
The number of auxiliary LED lights permitted to be installed on a motorcycle varies based on local regulations and laws. There are differences in regulations regarding motorcycle auxiliary lights, including their placement, brightness, and number.
Know your local DMV’s (Department of Motor Vehicles) rules. For road safety and to prevent distractions and visibility problems, these regulations are in place. Make sure any auxiliary LED lights you install on your motorcycle comply with local laws.
Are There Different Wiring Connectors For Auxiliary Lights?
Yes, there are different types of wiring connectors that can be used for auxiliary LED lights. Choose a connector based on the type of wiring, its ability to resist water, and your personal preferences for auxiliary lights.
Some common types of connectors include Deutsch connectors, weatherproof connectors, and bullet connectors. You need to select connectors based on environment, installation ease, water resistance, and wiring compatibility.
How many LEDs can be connected to a 12-volt battery?
It depends on each LED’s current requirement and the battery’s capacity how many LEDs can be connected to a 12V battery. Divide the battery’s amp-hour capacity by the current of one LED. For example, a 10-Ah battery could power around 100 LEDs that draw 0.1 A each. LEDs can be damaged or drain batteries quickly if they are overcharged or plugged in incorrectly. Check the LED specs and consult an expert for optimal performance.
How Can I Wire Auxiliary Lights Safely?
Before turning on auxiliary LED lights, make sure connections are secure. Don’t mix different wires. Use tape or tubing to protect connections and prevent short circuits. Fasten wires to avoid hanging or rubbing. Pick the right wire thickness for safety. Test the lights before finalizing. Be careful not to cut or pinch the wires. Disconnect the battery before working. Ground lights properly and use fuses to prevent overloading. Waterproof connections if needed. Read manuals and use color codes for clarity.
Keep your light circuit separate. Stay informed about wiring safety. If unsure, get professional help. These steps ensure a safe and reliable auxiliary light installation.
What are the different types of auxiliary lights?
Auxiliary lights are designed for various purposes, including fog, driving, working, emergency, rock, interior, marine, aircraft, off-road, bicycle, and motorcycle. They make things easier to see and safer. They can be used on various vehicles, gear, and settings.
Where is the auxiliary lamp installed?
Auxiliary lamps are mounted on vehicles for various purposes, such as visibility, aesthetics, or safety. Common places to put them are on bumpers, grilles, roof racks, and brackets. Locations depend on the angle and purpose you want, as well as local laws and how practical they are.

What are the 3 main types of lights?
The three main types of light are ambient light, task light, and accent light.
Ambient Light: This is a room’s general lighting. It illuminates a place and makes daily tasks comfortable.
Task Light: Task lighting is brighter to help you read, cook, or work. It makes sure you can see and work in a particular area.
Accent Light: Accent lighting highlights objects and areas. It highlights artwork, decorative elements, and architectural details.
These three types of lighting work together to create a functional and balanced lighting design for different environments.
Read Also: How To Change Mercedes Ambient Lighting
Final Thoughts
Wiring auxiliary LED lights to your Harley Davidson motorcycle or car is a worthwhile investment in both safety and aesthetics. You reduce the risk of accidents and improve your driving experience by increasing road visibility. Follow the article’s steps, gather tools and materials, and consider installation tips.
Remember to regularly inspect and maintain your auxiliary lights for optimal performance. Enjoy the improved visibility that your auxiliary LED lights provide while staying safe!
Note: For a more detailed guide on wiring your specific make and model of Harley Davidson or car, refer to the manufacturer’s instructions or consult a professional.
READ ALSO: Benefits Of Choosing Parmen Pro-Led Flood Light As Your Outdoor Light


