Looking for a Tuya Smart Camera Setup? Smart cameras can help you feel more secure at home. Tuya Smart Camera is the right choice. But you don’t know how to set up a Tuya camera. Tuya Smart Camera Setup is easy. You just need a stable Wi-Fi network and the Tuya Smart Camera Setup app on your phone.
This guide will show you how to connect your Tuya camera to your home Wi-Fi. Plus, if you hit an issue like Tuya smart camera setup not working or Tuya smart camera motion detection, we’ve got tips to fix common problems.
Let’s get your Tuya smart camera set up and running for a safer home.
Tuya Smart Camera Setup Guide
Tuya smart cameras are easy to set up. For a quick start, here are some guidelines:

You need a Wi-Fi network with a 2.4 GHz frequency to use your phone. If your Wi-Fi combines 2.4 GHz and 5 GHz, name each separately.
Ensure your phone is prepared. Turn off your VPN or adblocking apps. It may be difficult to set up due to these issues.
Set up the camera near your Wi-Fi router. It ensures a strong connection. Remove the lens cap from the camera before you begin!
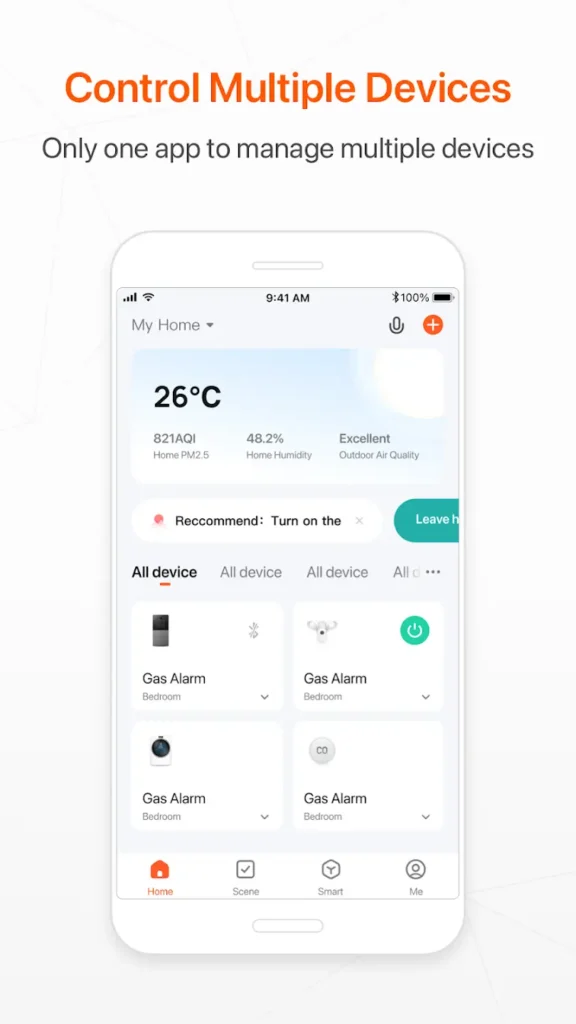
Install the Tuya Smart App: You can download the Tuya Smart app through the App Store or Google Play. Sign up, set your location, accept the terms, and verify your account.
Log in if you already have a Tuya account. You can use Alexa and Google Assistant with this account to enjoy extra features like cloud storage.
If you have a Bluetooth-enabled camera, make sure your phone is enabled as well.
To connect your camera to Wi-Fi, launch the Tuya Smart app and follow the on-screen instructions.
Once connected, you can move the camera to the desired location. Keep your Wi-Fi range within reach.
Explore the app with your camera set up. View live footage, adjust settings, and more.
It’s important to take your time to set up your camera correctly so that it works well. If you run into problems, Tuya’s customer support is available, as is the app’s help section. Your home now has a higher level of security!
Tuya Smart Camera Setup: add-on
It is the key step in starting your journey to a smarter, safer home. It’s easy to do this:
First, make sure you’ve got the Tuya Smart app open on your phone or tablet. This device should already be connected to your home’s Wi-Fi network. Look for the “+” icon or the “Add device” option within the app.
If your location services are turned off, the app will ask you to switch them on and give the necessary permissions. This helps the app know where to set up your device.
Next, you’ll need to tell the app what kind of device you’re adding. Look for the “Camera & Lock” category and tap it. Now, you’ll see a list of Tuya smart camera types: Wi-Fi, BLE, Dual Band, 4G, or even a doorbell camera. Choose the one that best fits your model.
It’s time to wake up your camera. Plug it into a power source and press the RESET button for about 5 seconds. You’re aiming for the camera’s LED light to start flashing quickly; that’s how you know it’s ready to pair.
When the camera’s indicator light blinks or it gives you a voice prompt, confirm on the app that this has happened and press ‘Next’. Now, connect the camera to your Wi-Fi. Remember, it needs to be the 2.4 GHz band. Enter your Wi-Fi password carefully and move on to the next step.
The program will prompt you to scan a QR code. Hold your camera about 10 to 15 centimeters away from the QR code displayed on your app screen. When you hear a voice prompt confirming the scan, tap the “I heard a prompt” button.
The app will now do its magic. It will scan for the camera, register it, and get it set up. When you see the “Added successfully” notification, you’ll know it’s finished. You can then give your camera a name that makes sense to you, like “Front Door” or “Baby’s Room”. Hit ‘Done’, and you’re all set.
Your camera should now appear on the app’s home screen. Tap on it to see the live feed and start exploring the settings. Customize it to your heart’s content, and enjoy the peace of mind that comes with your new Tuya Smart Camera Setup.
Troubleshooting Common Setup Issues
If your Tuya Smart Camera won’t connect to Wi-Fi, check that you’re on the 2.4 GHz band. A router restart and a camera reboot often solve a connection problem.
If your videos are blurry, move your camera closer to your router for a stronger Wi-Fi signal and adjust the video settings in the app.
Is motion detection turned off? For a better detection rate, increase the sensitivity settings in the app. If your camera does not have enough storage for recordings, you can adjust the quality and length in the app.
When the camera lens is dirty, use a soft cloth to clean it. Install updates from the app store to keep your Tuya Smart Camera Setup app up to date.
If you still need assistance, Tuya’s customer support team is ready to help.
Read Also: How To Do Merkury Camera Setup? Here Are 5 Simple Steps
FAQ: Tuya Smart Camera Setup
Can I use any app for a WiFi camera?
For a Wi-Fi camera, you generally need to use the specific app designed for that camera. Many Wi-Fi cameras come with apps that optimize the setup, use, and access to features that are unique to the camera.
For example, Tuya-based cameras typically require the Tuya Smart app or the Smart Life app, as both are compatible with Tuya devices.
Why is my Tuya smart camera not connecting to Wi-Fi?
If your Tuya Smart Camera Setup is not connecting to Wi-Fi, it could be for several reasons. Ensure that your camera is in setup mode, which is usually indicated by a flashing light.
If it’s not in setup mode, you might need to reset the camera. Check that you’re connecting to a 2.4 GHz Wi-Fi network since many smart cameras don’t support the 5 GHz band. Also, verify that your Wi-Fi password is correct and that you have a strong signal from your Wi-Fi router.
How do I connect my Smart Life camera to Wi-Fi?
To connect your Smart Life camera to Wi-Fi, you’ll need to use the Smart Life app. Open the app, create an account or log in, and tap to add a new device.
Select the camera from the device list and ensure that it’s powered on and in pairing mode. Follow the prompts in the app to connect the camera to your Wi-Fi network, making sure you’re on a 2.4 GHz network.
How do I set up my Wi-Fi smart camera?
When setting up any Wi-Fi smart camera, download the corresponding app and create an account. Power on your camera and ensure it’s in pairing mode. Add the camera to the app, select the correct Wi-Fi network, and enter your password.
Follow any additional instructions provided by the app to complete the setup. If you run into issues, consult the camera’s manual or customer support for the specific model you’re trying to set up.
Read Also: Geeni Camera Won’t Scan QR Code: Here Are 9 Simple Steps You Can Try.
In conclusion, you must ensure your Wi-Fi is on the right frequency, download the Tuya Smart app, and sync your camera. Once the Tuya Smart Camera is set up, explore the app’s features to maximize your home security.
Set up motion detection and video quality according to your needs. You can always contact Tuya Smart’s customer support if you need a helping hand in keeping your home safe and secure.


